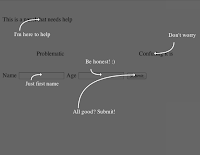
Auto generate help overlay for web and phone apps using SVG
 Reading tutorials and help documents is not the favorite activity of any user so it's getting trendier to create semi transparent help overlays highlighting the basic features of a website or phone app - to speed up the learning process. While these overlays are usually hand drawn, they can be automated using SVG and JavaScript.
As SVG allows us to draw Bezier curves, all we need to do is find a place for our help text, draw a nice curvy line from it to the target element and add an arrow head to the line, imitating as it was really pointing to that element.
To create the arrow's head, it's practical to create a named marker then reference to it:
<defs>
<marker id="head" markerheight="4" markerwidth="2" orient="auto" refx="0.1" refy="2">
  <path d="M0,0 V4 L2,2 Z" fill="black" id="headpoly"></path>
</marker>
</defs>
When drawing a straight line with arrow we just tell the path to use the marker at its end setting the marker-end attribute to be "url(#head)", like this:
<path marker-end="url(#head)" stroke-width="2" fill="none" stroke="black" d="M0,0 50,50" />
This will draw a black straight line from 0,0 to 50,50 and add an arrow head to on on the lower right side.
To make a Bezier line with an arrow at the end, we just simply need to add a middle point to the path using the "Q" parameter:
<path marker-end="url(#head)" stroke-width="2" fill="none" stroke="black" d="M0,0 Q50,0 50,50" />
This will draw the same line, except add a Bezier point to 50, 0 which will bend the straight towards 50,0.
Adding help to a DOM element
So we can draw a nice curvy arrow from any point on the screen to any other point. To add a help text pointing to any dom element we need to find the element's position on the screen and add a line ending in its middle point. Using jQuery it's very easy to get an absolute position using the .offset() function. To get the line's beginning position we just need to "guess" it: if we want to place below the element, add couple of pixels to the Y coordinate and so on.
To create a text SVG element at the beginning of the line, we just set its position and font size:
<text x="0" y="0" fill="black" font-size="15">Help Text</text>
Putting it all together
As we want to use JavaScript to dynamically add the help panel and arrows to any page, we simple need to create the SVG elements on the fly and add to the page structure. A small computation needs to be done to find the correct from and to coordinates on the screen but that's it.
The working sample can be tested here: http://bit.ly/svghelp
Note: some older browsers do not support SVG (like Android 2.x series) so a fallback option to Canvas might be required - we might need to give up the arrow's head but at least it's backward compatible.
var m = {}; // namespace
m.help = {}; // namespace

/**
 * Add the help overlay SVG panel to the DOM.
 */
m.help.addSVG = function () {
    var svg = $("<div id='helpsvg' style='width:100%;height:100%;"+
                "background-color:rgba(0,0,0,0.6);position:absolute;top:0;left:0;"+
                "z-index:2000'><svg xmlns='http://www.w3.org/2000/svg'"+
                "style='width:100%;height:100%'><defs><marker id='head'"+
                "orient='auto' markerWidth='2' markerHeight='4' refX='0.1' "+
                "refY='2'><path id='headpoly' d='M0,0 V4 L2,2 Z' fill='black'"+
                "/></marker></defs></svg></div");

    $(document.body).append(svg);
}

/**
 * Removes the help panel from the DOM completely.
 */
m.help.remove = function () {
    var svg = $('#helpsvg');
    if (!svg) {
        return;
    }
    svg.remove();
}

/**
 * Add a help label to the specified position.
 * @param {number} tox
 * @param {number} toy
 * @param {string} label
 * @param {string} pos
 * @param {number=} length
 */
m.help.addLabel = function (tox, toy, label, pos, length) {
    var svg = $('#helpsvg svg');
    if (!svg) {
        return;
    }

    var awayx = 50;
    var awayy = 30;

    if (pos.indexOf("top") > -1) {
        awayy *= -1;
    }

    if (pos.indexOf("left") > -1) {
        awayx *= -1;
    }

    if (length) {
        awayx *= length;
        awayy *= length;
    }

    var fromx = tox + awayx;
    var fromy = toy + awayy;
    var labelawayx = -15;
    var labelawayy = awayy > 0 ? 15 : -15;
    var color = 'white';

    var midx = fromx;
    var midy = toy;
    var ns = "http://www.w3.org/2000/svg";

    var path = document.createElementNS(ns, "path");
    path.setAttribute('marker-end', 'url(#head)');
    path.setAttribute('stroke-width', '2');
    path.setAttribute('fill', 'none');
    path.setAttribute('stroke', color);
    path.setAttribute('d', 'M' + fromx + ',' + fromy + ' Q' + midx + ',' + midy + ' ' + tox + ',' + toy);

    var text = document.createElementNS(ns, "text");
    text.setAttribute('x', fromx + labelawayx);
    text.setAttribute('y', fromy + labelawayy);
    text.setAttribute('fill', color);
    text.setAttribute('font-size', 15);
    var data = document.createTextNode(label);
    text.appendChild(data);

    document.getElementById('headpoly').setAttribute('fill', color);

    svg.append(path);
    svg.append(text);
}

/**
 * Add help label to an element on the screen.
 * @param {jQuery} dom
 * @param {string} label
 * @param {string} pos
 * @param {number=} length
 */
m.help.addLabelTo = function (dom, label, pos, length) {
    if (!dom) {
        return;
    }
    var offset = dom.offset();
    var width = dom.width();
    var height = dom.height();
    m.help.addLabel(offset.left + width / 2, offset.top + height / 2, label, pos, length);
}

// Sample usage
// m.help.addSVG();
// m.help.addLabelTo($('#elementId'), "I'm here to help", "bottomleft");
// $(document).click(m.help.remove);


Great post. This was very helpful and we have used it in our own development with some enhancements. https://one.iu.edu/
ReplyDeleteHi Adam, thanks for this post. I'm curious if one was to use the code you posted above, what license would you put on it?
ReplyDeleteHi Eric, just use as you want.
DeleteGreat, thanks.
DeleteGreat work mate. Really good starting point for getting a help System up and running. Have you thought of putting it on github with some documentation ?
ReplyDelete