Posts

Showing posts from 2021

Octoprint as a systemd service - running it with high priority

Image
Octoprint provides remote access to your 3D printer, and as it's written in Python, you can run it on practically any operating system. If you are using a standard Raspberry PI image (for instance, because you run it on an Orange PI ), rather than the customised Octoprint image, you can manually install it and create a systemd service to run it: Add this to /etc/systemd/system/octoprint.service  [Unit] Description=Octoprint After=network.target [Service] ExecStart=/home/pi/octoprint/bin/octoprint serve WorkingDirectory=/home/pi/octoprint StandardOutput=inherit StandardError=inherit Restart=always User=pi CPUSchedulingPolicy=rr CPUSchedulingPriority=80 [Install] WantedBy=multi-user.target Then run sudo systemctl daemon-reload sudo systemctl enable octoprint This will start Octoprint on every reboot with a high priority (so unlikely to stutter during printing).

Fusion 360 - part list dimensions, counts, and total amounts (lengths)

Image
  A requirement that comes up often, especially in woodworking, is to be able to list out all materials used in bodies and components - dimensions, counts of each cut, and total lengths of materials used. There is a way to create a separate component from each body and manually add a description that will appear in a part list on a drawing, but it's unnecessarily labour intensive. Automated parts-list addon Fusion 360 provides a  Python API   that enables direct access to the objects in a design, so I created a simple Fusion 360 script that can be used as an addon or run directly to display to cuts required for the design and the total amount of length used by each material type. To run directly, download the script from GitHub , place it anywhere. Then in Fusion 360 click "View" > "Show Text Commands"; in the commands window on the bottom, change from "Txt" to "Py", and run the following command: import neu_dev; neu_dev.run_script("

Triggering an Alexa routine from the command line or an Arduino compatible device (ESP32)

Image
By creating an auto-resetting virtual sensor on SmartThings.com, Alexa can execute a routine when the virtual sensor's state is triggered via a REST call to SmartThings.com Steps to follow Creating a virtual, auto-resetting sensor on SmartThings.com Register an account with SmartThings.com Go to My device handlers Create a new device handler  Switch to "From code" and paste in the auto-resetting sensor code from here. Go to My Locations and add a new location (e.g., "Living Room") Go to My Devices and add a new device Name, Label, Zigbee Id, Device Network Id = MyVirtualButton Type = Simulated Alexa Button (probably the last item in the dropdown) Location = Living Room (or whatever you created) Hub, Group = (e

NumPy / Sklearn performance comparison - macOS, Ubuntu, Windows 10 - use Anaconda

Image
One of the advantages to use a Hackintosh is that you can try the same software on the same hardware across three operating systems: how does NumPy - and therefore Sklearn - perform across different operating systems and mathematics libraries? I created a simple Sklearn routine , which utilises a single thread for its calculations. Results Hardware Os Python Math library Comment Time (s) Macbook Air m1 MacOS Big Sur 3.9.1 CBLAS/LAPACK Anaconda install 22 Intel 9600k Ubuntu 20.04 3.8.5 OpenBLAS standard apt and pip install 27 Intel 9600k Ubuntu 20.04 3.9.0 OpenBLAS standard apt and pip install 27 Intel 9600k MacOS Catalina 3.8.5 MKL Hackintosh with Clover, Anaconda install 28 Intel 9600k Windows 10 3.8.5 MKL Anaconda install 28 Intel 9600k MacOS Big Sur 3.9.1 OpenBLAS Hac

ESP32 - send a push notification from the Arduino ESP32 device to your phone

Image
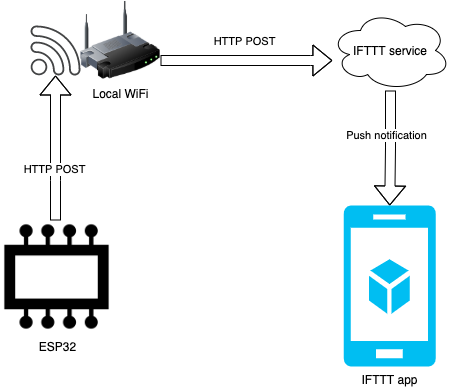
Sending a push notification to your phone from an event from an ESP32 is simple. What you'll need (if you are using a Mac for development): Arduino IDE Arduino for ESP32 Serial port simulator for ESP32 to upload your code to the board Wifi network IFTTT account IFTTT app on your phone Wifi network that your ESP32 board can access Architecture Create an IFTTT applet This should read something like this: If Maker Event "notification", then Send a notification from the IFTTT app Change the notification template Go to the settings of your new IFTTT applet and change the template to include "Value1", like this: Get your Webhook endpoint in IFTTT On your applet, click the triangle looking thing (webhook), then Settings, or simply go to this URL  https://ifttt.com/maker_webhooks/settings   Visit the private URL in your browser, replace the trigger name with "notification", so it reads like ...trigger/notification/ with/... and in the Value1 field type in a